This is a Step-by-Step tutorial for Provisioning a SharePoint 2016 Preview Single-Server Farm in Azure. We will Create SharePoint 2016 Farm with Azure Virtual Machines – VM1 for hosting Active Directory + Domain Controller + SharePoint 2016 Preview and VM2 for Provisioning SQL Server 2014. I am using the standard MSDN Subscription to provision Azure servers.
If you are very new to SharePoint 2016 check the Things you need to know before you Install SharePoint 2016 Preview
The hardware and software requirements for our 2-tier farm topology are :
Software Requirements:
VM1 : Windows Server 2016 Technical Preview 3 with Active Directory Services and Domain Controller
VM2 : Windows Server 2012 R2 and SQL Server 2014 SP1
Hardware Requirements:
VM1 : D3 (4 CORE(S), 14 GB memory)
VM2 : A4 (8 cores, 14 GB memory)

This is a three part blog Series. The high-level steps are :
1) Create a Virtual Network and provision a Virtual Machine for hosting Active Directory and a Domain Controller {this post}.
2) Provision a SQL Server VM and add it as a part of a Domain Controller
3) Lastly, Install SharePoint 2016 Preview on the first VM (with AD and DC).
Update : SharePoint Server 2016 IT Preview VM is now available on Azure. Instead of VM1, you can also now provision the out of box SharePoint Server 2016 IT Preview VM (Windows Server 2012) as a third VM (VM3) and then include it to the virtual network. See the detailed post SharePoint Server 2016 IT Preview VM is now on Azure (3-tier farm).
Let’s start with the first Step :
1. Create a Virtual Network
In your Azure account Portal, select New at the bottom and then select Network Services -> Virtual Netwrok -> Custom Create .

Give your Virtual Network a name

Leave the DNS & VPN Settings blank for now.

Next, add additional subnets if you want or leave it as it is. For this example we will use the default Subnets.

Finally, Create the Virtual Network

Now the Virtual Network has been Provisioned, lets Create our first Virtual Machine (VM1)
2. Create a Virtual Machine (VM1)
Select New at the bottom and then navigate to Compute -> Virtual Machine -> From Gallery

Select Windows Server 2016 Technical Preview 3 under Windows (on left)

Give your VM a name and create a username & password for accessing the VM.

Next enter a Cloud Service DNS name and select the Virtual Network (created in Step# 1). Select the existing Subnet and add the value for new availability set.

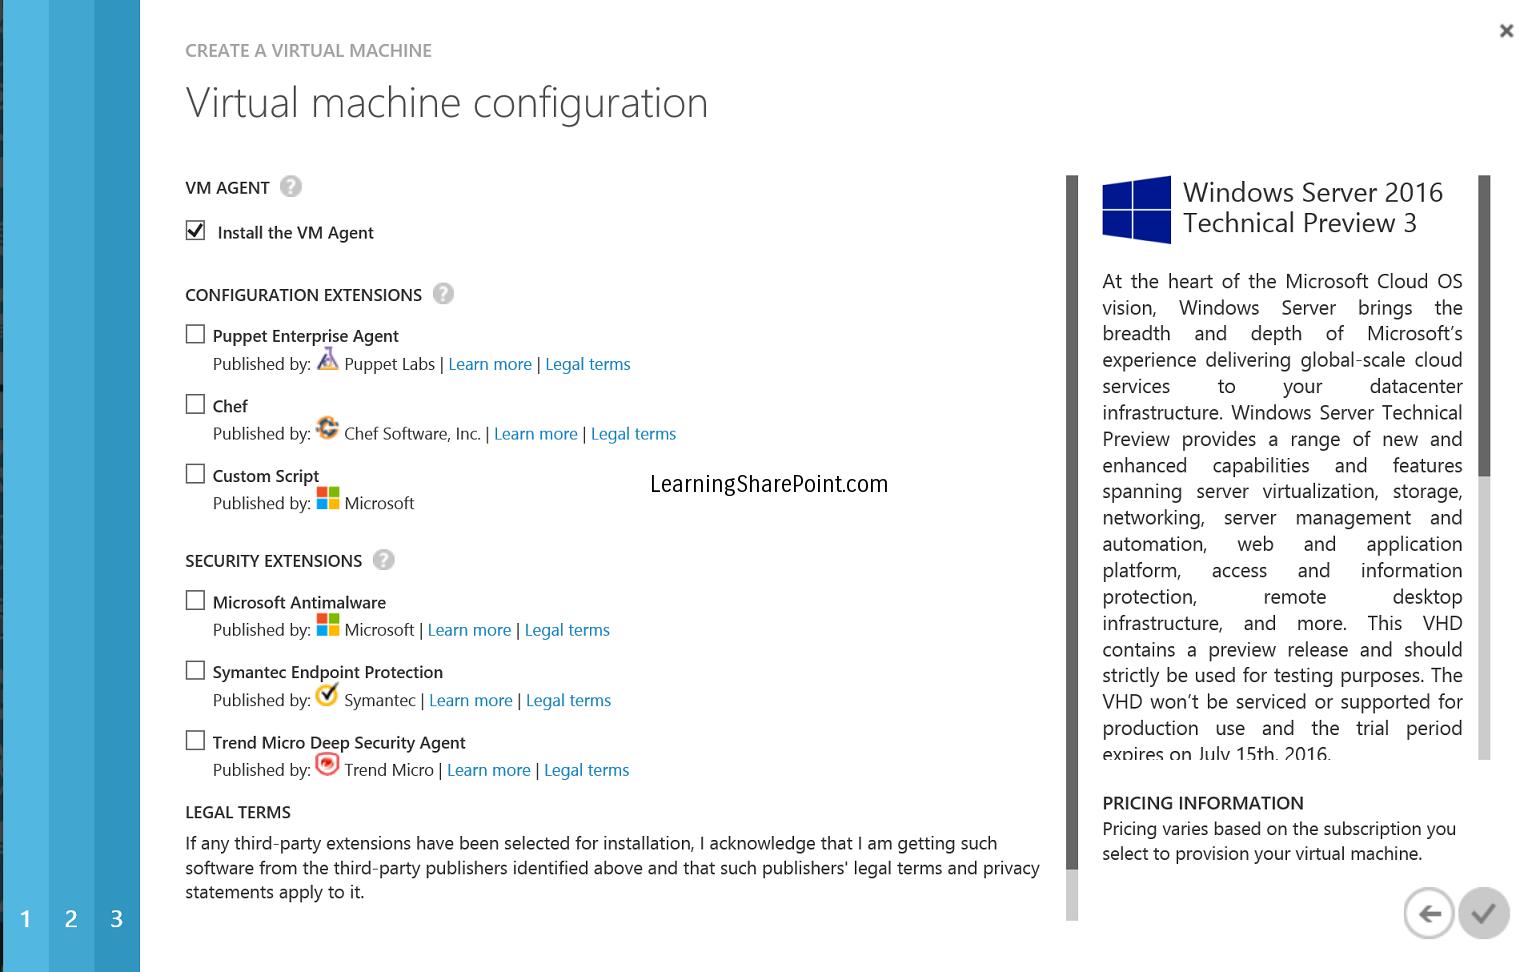
Finally, Install the Agent.

3. Next, we need to Assign a Static IP to the machine VM1 before installing Active Directory Services and provisioning it as a Domain Controller.
To do this, first Connect to your Microsoft Azure subscription using PowerShell. Once you are connected, choose an IP and assign it to VM1 Domain Controller VM.
Run the following to see if the IP 10.0.0.1 is available to be used as a Static IP.
Test-AzureStaticVNetIP -VNetName SP2016 -IPAddress 10.0.0.1
If it returns false, look for the AvailableAddresses to choose the Static IP that you can use. For this example, we will use 10.0.0.10 as per the AvailableAddresses. Run the following to test if 10.0.0.10 is available.
Test-AzureStaticVNetIP -VNetName SP2016 -IPAddress 10.0.0.10

Next, Run the following to Set the Static IP to 10.0.0.10
Get-AzureVM -ServiceName SP2016VM -Name SP2016 | Set-AzureStaticVNetIP -IPAddress 10.0.0.10 | Update-AzureVM

Make sure you see the Succeeded message after running the command.
You can also Verify the IP by selecting the VM and navigating to the Dashboard.

4. Next, Connect to the Virtual Machine VM1 to install the Active Directory Services.
Login to the server and in Server Manager, select Add Roles and Features.

Follow the Wizard as per below to install Active Directory Services


Wait for the Installation to be completed.
5. Once the Active Directory is installed, let’s promote our VM1 server to Domain Controller.
Select Promote this server to Domain Controller in Server Manager. See below.

Follow the Wizard as per below,


Select Install to complete the Installation.
5. The last step is to Configure the new IP and Domain in DNS settings of the Virtual Network.
To do this navigate to the virtual network and select Configure. Add the DNS name and IP for the VM.

Next we will look at Provisioning a SQL Server VM
If you are very new to SharePoint 2016 check the Things you need to know before you Install SharePoint 2016 Preview
The hardware and software requirements for our 2-tier farm topology are :
Software Requirements:
VM1 : Windows Server 2016 Technical Preview 3 with Active Directory Services and Domain Controller
VM2 : Windows Server 2012 R2 and SQL Server 2014 SP1
Hardware Requirements:
VM1 : D3 (4 CORE(S), 14 GB memory)
VM2 : A4 (8 cores, 14 GB memory)

This is a three part blog Series. The high-level steps are :
1) Create a Virtual Network and provision a Virtual Machine for hosting Active Directory and a Domain Controller {this post}.
2) Provision a SQL Server VM and add it as a part of a Domain Controller
3) Lastly, Install SharePoint 2016 Preview on the first VM (with AD and DC).
Update : SharePoint Server 2016 IT Preview VM is now available on Azure. Instead of VM1, you can also now provision the out of box SharePoint Server 2016 IT Preview VM (Windows Server 2012) as a third VM (VM3) and then include it to the virtual network. See the detailed post SharePoint Server 2016 IT Preview VM is now on Azure (3-tier farm).
Let’s start with the first Step :
1. Create a Virtual Network
In your Azure account Portal, select New at the bottom and then select Network Services -> Virtual Netwrok -> Custom Create .

Give your Virtual Network a name

Leave the DNS & VPN Settings blank for now.

Next, add additional subnets if you want or leave it as it is. For this example we will use the default Subnets.

Finally, Create the Virtual Network

Now the Virtual Network has been Provisioned, lets Create our first Virtual Machine (VM1)
2. Create a Virtual Machine (VM1)
Select New at the bottom and then navigate to Compute -> Virtual Machine -> From Gallery

Select Windows Server 2016 Technical Preview 3 under Windows (on left)

Give your VM a name and create a username & password for accessing the VM.

Next enter a Cloud Service DNS name and select the Virtual Network (created in Step# 1). Select the existing Subnet and add the value for new availability set.

Finally, Install the Agent.
3. Next, we need to Assign a Static IP to the machine VM1 before installing Active Directory Services and provisioning it as a Domain Controller.
To do this, first Connect to your Microsoft Azure subscription using PowerShell. Once you are connected, choose an IP and assign it to VM1 Domain Controller VM.
Run the following to see if the IP 10.0.0.1 is available to be used as a Static IP.
Test-AzureStaticVNetIP -VNetName SP2016 -IPAddress 10.0.0.1
If it returns false, look for the AvailableAddresses to choose the Static IP that you can use. For this example, we will use 10.0.0.10 as per the AvailableAddresses. Run the following to test if 10.0.0.10 is available.
Test-AzureStaticVNetIP -VNetName SP2016 -IPAddress 10.0.0.10

Next, Run the following to Set the Static IP to 10.0.0.10
Get-AzureVM -ServiceName SP2016VM -Name SP2016 | Set-AzureStaticVNetIP -IPAddress 10.0.0.10 | Update-AzureVM

Make sure you see the Succeeded message after running the command.
You can also Verify the IP by selecting the VM and navigating to the Dashboard.

4. Next, Connect to the Virtual Machine VM1 to install the Active Directory Services.
Login to the server and in Server Manager, select Add Roles and Features.

Follow the Wizard as per below to install Active Directory Services


Wait for the Installation to be completed.
5. Once the Active Directory is installed, let’s promote our VM1 server to Domain Controller.
Select Promote this server to Domain Controller in Server Manager. See below.

Follow the Wizard as per below,


Select Install to complete the Installation.
5. The last step is to Configure the new IP and Domain in DNS settings of the Virtual Network.
To do this navigate to the virtual network and select Configure. Add the DNS name and IP for the VM.

Next we will look at Provisioning a SQL Server VM
No comments:
Post a Comment